

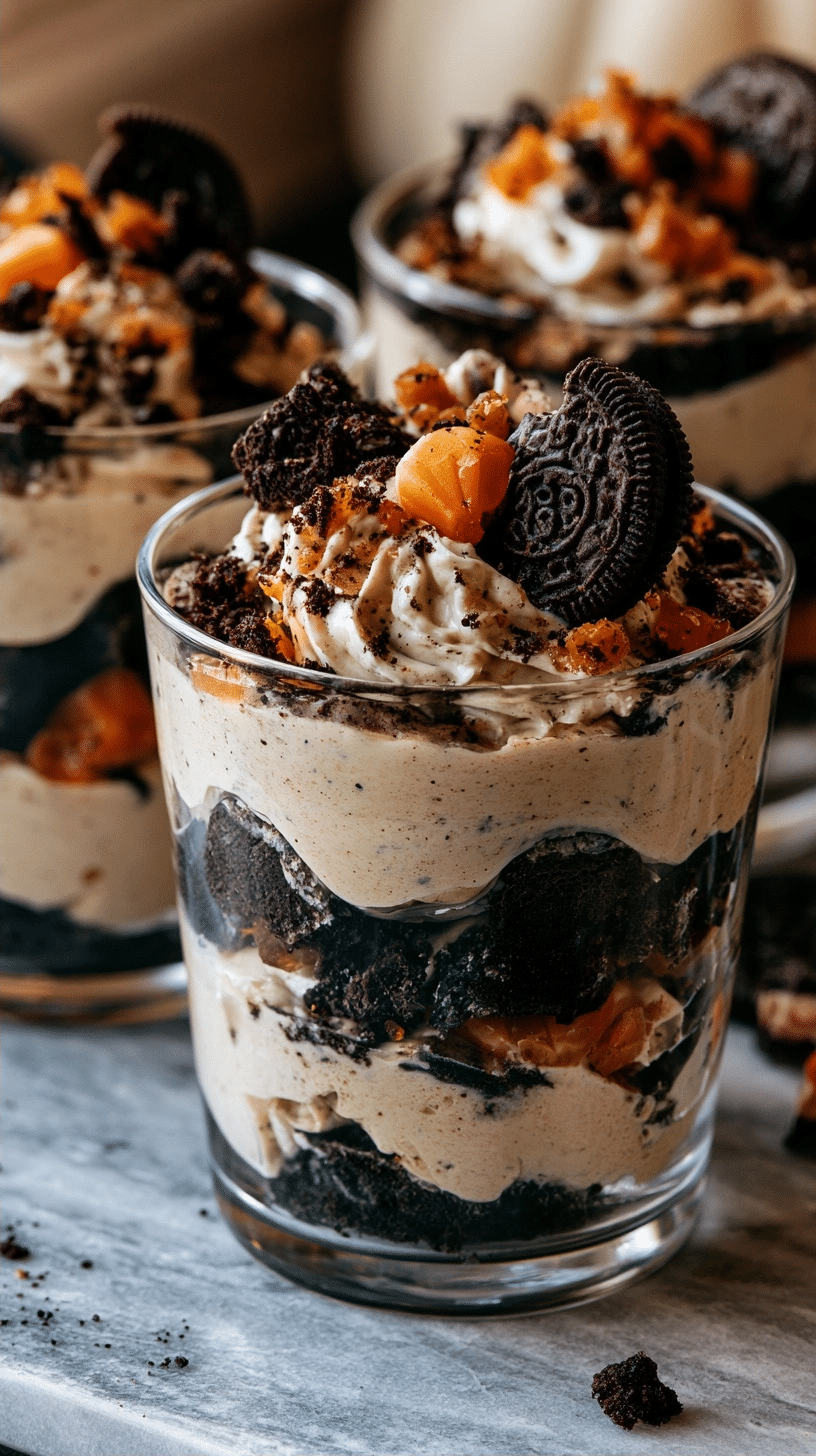
Halloween Oreo Dirt Cake is a festive, layered dessert that combines crushed cookies with a rich, creamy orange pudding filling for a spooky seasonal delight. Ideal for busy hosts, this no-bake recipe captures the essence of classic dirt cake with a vibrant, holiday-themed twist that appeals to both children and adults alike. The contrast between the crunchy chocolate sandwich cookies and the smooth, velvety pudding creates a satisfying texture in every bite. With its bold color and nostalgic flavor, this simple dessert provides a reliable centerpiece for any festive gathering or celebratory event.
What Is Halloween Oreo Dirt Cake?
Halloween Oreo Dirt Cake is a traditional no-bake dessert featuring alternating layers of finely crushed chocolate sandwich cookies and a sweetened, colored pudding-based cream mixture. Unlike standard versions of the dish, this variation utilizes seasonal orange-themed ingredients to create a visually striking appearance that fits autumn celebrations perfectly. The recipe relies on the deep, earthy cocoa notes of the cookies to ground the sweetness of the pudding. It distinguishes itself from similar layered parfaits through its dense, soil-like texture and its signature ability to hold structure when chilled in a large trifle bowl.
| Prep Time | 20 minutes |
| Cook Time | 0 minutes |
| Total Time | 2 hours 20 minutes |
| Servings | 12 |
| Difficulty Level | Easy |
| Cuisine | American |
| Calories per Serving | 385 |
Why You’ll Love This Recipe
Effortless assembly requiring no oven time or complex baking techniques.
Foolproof preparation that yields consistent, crowd-pleasing results every time.
Time-saving process allows you to prepare the dish hours before your guests arrive.
Visually appealing presentation that serves as a focal point for themed parties.
Scalable portions make it perfect for both intimate family nights and large potlucks.
This recipe provides a straightforward solution for those needing a quick yet impressive dessert. It eliminates the stress of complicated baking processes while delivering a nostalgic flavor profile. Whether you are hosting a festive party or looking for a weekend treat, this dirt cake offers a reliable, low-maintenance path to culinary success.
Why This Recipe Works
My first experience with this dessert involved a last-minute party request where I had limited time and few ingredients. I found that the secret to success lies in the balance between the moisture of the pudding mixture and the structural integrity of the crushed cookies.
Technically, the recipe works because of the interaction between the instant pudding, cream cheese, and whipped topping. By whisking the pudding until smooth and chilling it, you create a stable foundation. Adding the cream cheese and butter mixture creates a rich, emulsified base that holds its shape. The subsequent folding of the whipped topping introduces air into the mix, ensuring that the filling remains light despite its high sugar content.
The sensory payoff is driven by the texture development. When you let the cake rest for two hours, the cookies absorb just enough moisture to become tender, yet retain enough crunch to provide a contrast. The orange coloring adds a layer of visual excitement that heightens the anticipation of the deep chocolate flavor. This combination of textures, ranging from airy cream to crunchy cookie bits, ensures that every spoonful delivers a balanced bite that feels both indulgent and comforting.
Pro Tips Before You Start
Room Temperature Ingredients: Ensure your cream cheese and butter are at room temperature to prevent lumps in your filling. Mise en Place: Prepare all crushed cookies and measure your liquids before beginning to ensure a smooth assembly. Food Processor Usage: Use pulses to control the texture of the cookies, ensuring you maintain a mix of fine dust and larger chunks.
Ingredients
Here’s everything you’ll need to make this Halloween Oreo Dirt Cake.
| Ingredient | Quantity | Notes |
| Halloween Oreos | 20 oz (1.5 packages) | Crushed to varied textures |
| Instant Vanilla Pudding | 6.8 oz (2 packages) | 3.4 oz each |
| Milk | 3.25 cups | Whole milk recommended |
| Butter | 0.5 cup | Softened |
| Cream Cheese | 8 oz | Softened |
| Powdered Sugar | 1 cup | Sifted |
| Vanilla Extract | 1 tsp | Pure extract preferred |
| Cool Whip | 8 oz | Thawed |
| Orange Food Coloring | To preference | Gel preferred |
| Halloween Sprinkles | Optional | Decoration |
Best Ingredients for This Recipe
The quality of your chocolate sandwich cookies defines the flavor of the final dish. Using name-brand Halloween Oreos ensures that the cookie ratio remains consistent and the flavor is recognizable. If you use generic cookies, the filling might feel too sweet, as store brands sometimes have higher sugar content.
Additionally, the choice of milk significantly impacts the pudding texture. Whole milk provides the necessary fat content to achieve a thick, stable pudding base. Substituting with low-fat or non-dairy milks often results in a thinner filling that struggles to support the weight of the cookie layers.
Step-by-Step Instructions
Phase 1: Prepare the Cookies
Process 3/4 of the Oreos in a food processor until they reach a fine, grain-like consistency.
Transfer the fine crumbs to a medium bowl.
Pulse the remaining Oreos in the processor until they form smaller chunks.
Combine the fine crumbs and chunks in the bowl, stirring to ensure an even distribution.
Phase 2: Prepare the Creamy Filling
Whisk the milk and instant pudding mix in a large bowl for 2 minutes until completely smooth.
Chill the pudding in the refrigerator for 5 minutes.
Beat the softened cream cheese, butter, and powdered sugar together using an electric mixer until light and creamy.
Incorporate the chilled pudding into the cream cheese mixture, beating until fully combined.
Fold in the thawed whipped topping, vanilla extract, and orange food coloring using a rubber spatula.
Continue adding food coloring in small amounts until you reach your desired vibrant orange hue.
Phase 3: Final Assembly
Spread one-third of the crushed Oreo mixture evenly across the bottom of a large trifle bowl.
Ladle one-half of the orange pudding mixture over the cookie layer, smoothing it out carefully with a spatula.
Repeat the layers by adding another third of the cookies followed by the remaining pudding mixture.
Top the cake with the final third of the crushed cookies.
Decorate the surface with Halloween sprinkles or candy just before serving.
Chill the assembled cake for at least 2 hours, or up to 24 hours, to allow flavors to meld.
Chef Tips for Perfect Results
Control the Chill: Refrigerate the pudding base for exactly 5 minutes to prevent over-thickening before mixing.
Color Saturation: Use gel-based food coloring instead of liquid drops to achieve a deep orange without affecting the mixture consistency.
Even Layers: Use a flat spatula to level each layer of pudding to ensure the visuals look professional through the side of the glass.
Cookie Texture: Keep roughly 20 percent of your cookies as large, coarse pieces to add a distinct crunch.
Resting Period: Never skip the 2-hour chilling time, as this allows the cookies to soften slightly into the cream for a unified flavor.
Common Mistakes to Avoid
Overmixing the Filling: Mixing the whipped topping too vigorously deflates the air, resulting in a dense, heavy layer. Fold gently until just combined.
Using Warm Cream Cheese: Cream cheese that is too warm won’t emulsify with the butter, creating a greasy texture. Ensure ingredients are room temperature, not melted.
Uneven Cookie Crushing: Creating only dust results in a muddy texture. Always maintain a blend of fine crumbs and larger cookie chunks.
Too Much Liquid: Adding extra milk beyond the 3.25 cups makes the pudding layer runny. Stick strictly to the measurement to maintain structure.
How to Make This Recipe Healthier
You can adjust this recipe for a lighter profile without sacrificing the essential theme of the dessert.
Cream Cheese: Use Neufchâtel or low-fat cream cheese to reduce total fat while maintaining a similar creamy mouthfeel.
Whipped Topping: Swap standard whipped topping for a sugar-free version to reduce overall calorie count by approximately 15 percent.
Sugar Adjustment: Decrease the powdered sugar by half, relying on the natural sweetness of the cookies to flavor the dish.
Variations and Substitutions
This recipe is highly adaptable based on your dietary needs or flavor preferences.
| Ingredient | Substitution | Flavor Impact | Texture Impact |
| Oreos | Gluten-free chocolate cookies | Slightly nuttier | Similar |
| Whole Milk | Almond Milk | Subtle nuttiness | Slightly thinner |
| Cool Whip | Whipped coconut cream | Tropical note | Less stable |
Can You Make This Ahead?
Yes, this recipe is perfect for advance preparation. You can assemble the entire cake up to 24 hours in advance, keeping it covered tightly in the refrigerator. The cookies will soften during this time, creating the signature dirt cake texture that many prefer. If you plan to add delicate decorations like gummy candy, add those immediately before serving to keep them from absorbing moisture and becoming chewy.
Serving Suggestions and Pairings
Serve this dish in a clear glass trifle bowl to show off the distinct layers. For a complete festive experience, pair the dessert with a warm apple cider or a cup of dark roast coffee to balance the sweetness of the pudding. It works well as the centerpiece for a dessert table, surrounded by other small finger foods or seasonal fruits. Always use a long-handled spoon to ensure guests can scoop through all the layers easily.
Best Occasions to Serve This Recipe
This dessert excels at large festive gatherings, school parties, or casual office potlucks where a visually dramatic yet easy-to-serve treat is required. Its no-bake nature makes it a lifesaver during busy holiday weekends when your oven is occupied with main course preparations. Serve it for family movie nights or neighborhood gatherings to lean into the fun, spooky theme of the season.
Storage and Reheating
Store your leftovers in the refrigerator to maintain the texture and food safety. Do not attempt to reheat this dish, as the pudding and whipped topping will break down and lose their structure when exposed to heat.
| Method | Duration | Instructions |
| Refrigerator | 5 days | Cover tightly with plastic wrap or lid |
| Freezer | Not recommended | Texture will degrade significantly |
Nutritional Information
Approximate nutritional values per serving:
| Nutrient | Amount per Serving |
| Calories | 385 |
| Protein | 3g |
| Fat | 22g |
| Carbohydrates | 45g |
| Fiber | 1g |
| Sugar | 32g |
| Sodium | 420mg |
*Approximate values based on standard ingredients. Actual nutrition varies by brand and substitutions.
Conclusion
Halloween Oreo Dirt Cake offers an impressive, festive solution for any fall celebration, combining classic flavors with a fun, spooky presentation. By following these simple steps, you ensure a perfect balance of textures and a rich, creamy finish that guests will enjoy.
This recipe provides the versatility needed for various occasions, from casual family snacks to larger holiday parties. Its reliance on simple ingredients and straightforward techniques makes it accessible for all skill levels.
Try making this dessert for your next event and see how the combination of crunchy cookies and smooth orange filling delights your guests. Save this recipe for when you need a reliable, stress-free dessert that delivers consistent results every single time.
FAQ
Can I substitute Halloween Oreos with regular Oreos?
Yes, you can use regular chocolate sandwich cookies. The flavor will remain identical, and you can achieve the orange aesthetic by adding extra coloring to the pudding mixture.
How do I know when the dessert is ready to serve?
The dessert is ready once it has chilled for at least two hours. This time allows the pudding to set and the cookies to soften slightly, creating a harmonious texture.
What should I do if the pudding layer is too runny?
If the mixture seems too loose, ensure you have whisked the pudding with the milk for at least two minutes and allowed it to chill properly. Using whole milk is essential for proper thickening.
Can I make this the day before?
Yes, you can assemble the cake up to 24 hours in advance. Keep it tightly covered in the refrigerator until you are ready to serve.
How do I make this dessert gluten-free?
Substitute the standard sandwich cookies with gluten-free chocolate sandwich cookies. Ensure your instant pudding mix is also certified gluten-free to accommodate dietary restrictions.
Print
Halloween Oreo Dirt Cake
- Total Time: 140
- Yield: 12 servings
- Diet: Vegetarian
Description
This festive, no-bake Halloween Oreo Dirt Cake is a spooky and delicious layered dessert that is perfect for any autumn gathering. By combining finely crushed chocolate sandwich cookies with a rich, velvety orange-tinted pudding cream, this treat offers a satisfying contrast between crunchy and smooth textures. It is an effortless, crowd-pleasing centerpiece that requires no oven time, allowing you to prepare it ahead for a stress-free hosting experience. Visually striking and nostalgic in flavor, it is the ultimate treat for both kids and adults.
Ingredients
36 chocolate sandwich cookies, finely crushed
8 ounces cream cheese, softened
1/2 cup unsalted butter, softened
1 cup powdered sugar
2 packages (3.4 oz each) instant vanilla pudding mix
3 cups cold milk
12 ounces whipped topping, thawed
1/2 teaspoon orange gel food coloring
Instructions
In a large bowl, whisk together the instant vanilla pudding mix and cold milk until thickened.
In a separate bowl, cream together the softened cream cheese, butter, and powdered sugar until smooth.
Fold the whipped topping into the cream cheese mixture until combined.
Add the orange food coloring to the cream cheese mixture and stir until uniform in color.
Fold the pudding mixture into the orange cream cheese mixture until smooth.
In a trifle bowl or deep serving dish, spread a layer of crushed cookies on the bottom.
Top the cookie layer with a portion of the orange pudding mixture.
Repeat the layers until all ingredients are used, ending with a final layer of crushed cookies on top.
Refrigerate for at least 2 hours before serving to allow the flavors to meld and the cake to set.
Notes
For an extra spooky touch, you can add gummy worms or edible Halloween decorations on the final top layer of cookie crumbs. Ensure the cream cheese is fully softened to avoid lumps in the filling. Store covered in the refrigerator for up to 3 days.
- Prep Time: 20
- Category: Desserts
- Method: No-Bake
- Cuisine: American