
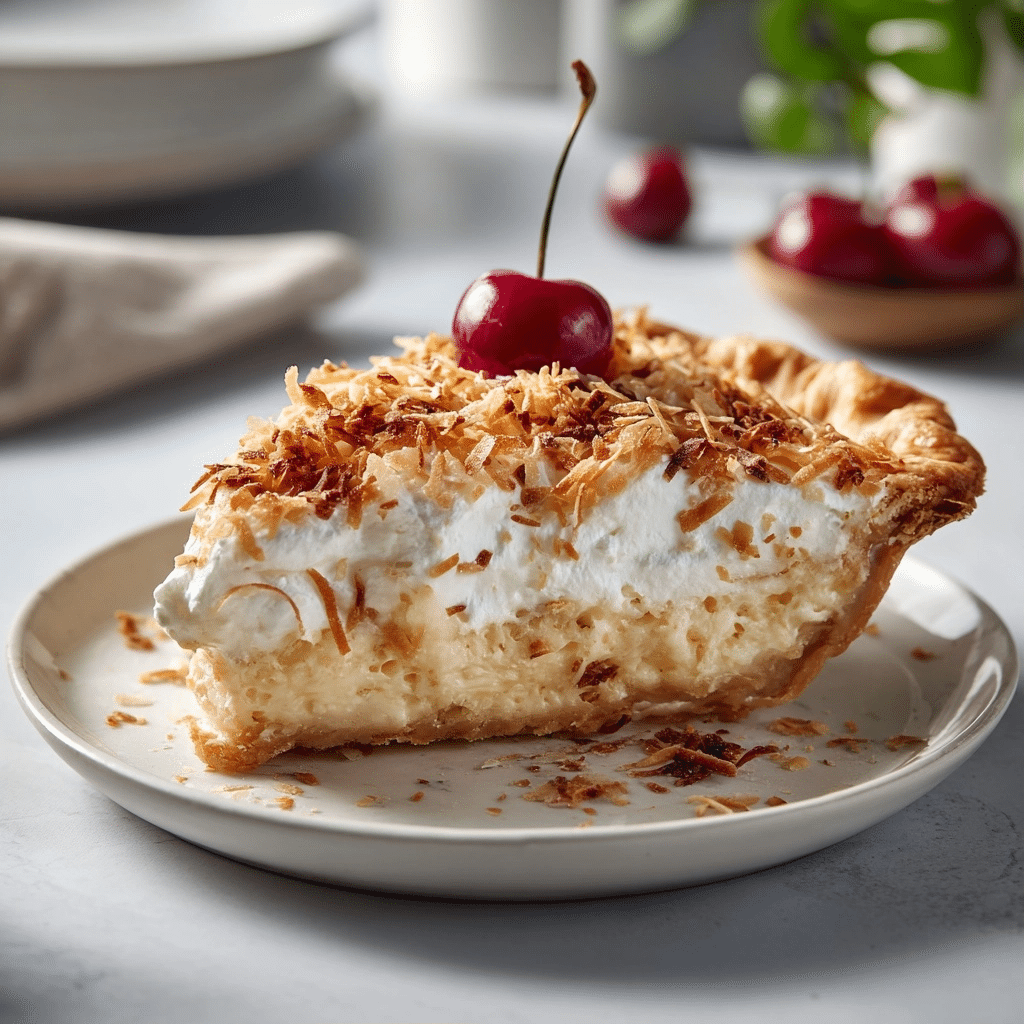
Coconut Cream Pie is a classic American custard dessert featuring a rich, velvety coconut filling nestled inside a flaky pre-baked pastry shell. This specific Coconut Cream Pie recipe utilizes a combination of whole milk and coconut milk to achieve a deep, authentic tropical profile without relying on artificial extracts. The structure relies on tempered egg yolks and cornstarch to create a sliceable consistency that remains stable after chilling for several hours. By incorporating shredded coconut directly into the warm custard, the oils release to infuse every bite with a natural sweetness and pleasantly chewy texture. Many home bakers prefer this method because it balances the dense creaminess of the filling with a cloud-like whipped cream topping and crunchy toasted coconut garnish. Whether served at a summer gathering or as a holiday centerpiece, this pie represents the gold standard of custard-based baking traditionalism.
Coconut Cream Pie Recipe Overview
| Prep Time | Cook Time | Total Time | Servings | Difficulty | Cuisine |
|---|---|---|---|---|---|
| 20 Minutes | 15 Minutes | 4 Hours 35 Minutes | 8 Slices | Intermediate | American |
Why This Recipe Works
This recipe succeeds because it prioritizes the science of emulsification and temperature control to prevent a runny filling. I have found that using three large egg yolks provides exactly the right amount of fat and protein to create a luxurious mouthfeel that holds its shape. The inclusion of full-fat coconut milk alongside whole milk ensures a robust flavor that imitation flavorings simply cannot replicate in a professional kitchen environment.
The cooking process relies on a gentle tempering technique that prevents the eggs from curdling when introduced to the hot milk. By slowly whisking the warm liquids into the dry ingredients, you create a smooth slurry that thickens uniformly as it returns to the heat. This method guarantees a silk-like texture that resists the common pitfall of becoming grainy or separating during the essential four-hour chilling period.
Essential Ingredients
| Ingredient | Quantity | Notes/Alternatives |
|---|---|---|
| Baked Pie Crust | 1 (9-inch) | Use a standard pastry or graham cracker crust. |
| Whole Milk | 2 Cups | Provides the creamy base; do not use skim milk. |
| Coconut Milk | 1 Cup | Use full-fat canned coconut milk for best flavor. |
| Egg Yolks | 3 Large | Adds richness and acts as a thickening agent. |
| Granulated Sugar | 2/3 Cup | Adjust slightly based on desired sweetness level. |
| Cornstarch | 1/4 Cup | Main thickener for a sliceable custard texture. |
| Shredded Coconut | 1 Cup | Use sweetened or unsweetened based on preference. |
| Whipped Cream | 2 Cups | Freshly whipped heavy cream provides the best lift. |
Step-by-Step Instructions
Phase 1: Preparing the Custard Base
- Heat the whole milk and coconut milk in a medium heavy-bottomed saucepan over medium heat until small bubbles form around the edges.
- Whisk the egg yolks, granulated sugar, and cornstarch together in a heat-proof glass bowl until the mixture is pale and smooth.
- Stream about half of the warm milk mixture into the egg mixture very slowly while whisking constantly to temper the yolks.
- Pour the tempered egg mixture back into the saucepan with the remaining hot milk to combine all base components.
Phase 2: Thickening and Flavoring
- Cook the mixture over medium heat while stirring continuously with a whisk or silicone spatula to reach the bottom of the pan.
- Continue heating until the custard reaches a thick, pudding-like consistency that coats the back of a spoon heavily.
- Remove the saucepan from the heat immediately once the first large bubbles of boiling appear on the surface.
- Stir in the shredded coconut until it is evenly distributed throughout the thick custard base.
Phase 3: Filling and Chilling
- Pour the hot coconut filling into the pre-baked and cooled pie crust, smoothing the top with an offset spatula.
- Press a piece of plastic wrap directly onto the surface of the custard to prevent a skin from forming.
- Chill the pie in the refrigerator for at least 4 hours, though overnight is preferred for maximum stability.
- Top the chilled pie with fresh whipped cream and optional toasted coconut flakes immediately before serving to guests.
Chef Tips for Perfect Results
- Temper your eggs carefully by adding only a tablespoon of hot liquid at a time for the first minute to avoid scrambling.
- Use a heavy-bottomed saucepan to distribute heat evenly and prevent the sugar in the milk from scorching on the bottom.
- Toast your shredded coconut garnish in a dry skillet for 3 minutes until golden to add a complex nutty aroma.
- Ensure your pie crust is completely cool before adding the warm filling to maintain a crisp, flaky bottom layer.
- Beat your heavy cream to stiff peaks if you plan on piping decorative swirls that need to hold their shape.
- Always use full-fat canned coconut milk rather than the refrigerated beverage variety for a superior fat content and mouthfeel.
Common Mistakes to Avoid
Under-cooking the custard is the most frequent error, resulting in a pie that collapses into a puddle when you cut a slice. You must wait until the mixture reaches a boil and thickens significantly to ensure the cornstarch molecules fully hydrate and gelatinize. Another mistake involves rushing the cooling process; the four-hour chilling period is non-negotiable for the proteins to set firmly. Forgetting to cover the custard surface with plastic wrap leads to a tough, rubbery skin that ruins the delicate texture of the pie. Finally, avoid using cold eggs, as room temperature yolks incorporate more smoothly into the sugar and starch mixture without creating lumps.
Variations and Substitutions
| Ingredient | Substitution | Impact on Flavor |
|---|---|---|
| Whole Milk | Half and Half | Creates an even richer, more buttery custard profile. |
| Cornstarch | Arrowroot Powder | Offers a slightly glossier finish with similar thickening power. |
| Shredded Coconut | Toasted Coconut | Provides a deeper, nuttier flavor and crunchier texture inside. |
| Pie Crust | Graham Cracker Crust | Adds a sweet, honey-like crunch that complements the coconut. |
Serving Suggestions and Pairings
Serve this Coconut Cream Pie on a chilled ceramic plate to maintain its temperature during long dessert courses or summer parties. It pairs exceptionally well with a hot cup of Kona coffee or a light herbal tea like chamomile. For special occasions like Easter brunch or backyard barbecues, garnish the top with fresh mango slices or a dusting of lime zest for a tropical flair. If you want to elevate the presentation, use a piping bag with a star tip to create an intricate border around the edge of the pie shell.
Storage and Reheating
| Method | Duration | Instructions |
|---|---|---|
| Refrigeration | 3-4 Days | Keep covered with plastic wrap or a pie dome. |
| Freezing | Not Recommended | The custard texture becomes grainy and weeps upon thawing. |
Nutritional Information
| Nutrient | Amount per Serving |
|---|---|
| Calories | 425 kcal |
| Total Fat | 28g |
| Saturated Fat | 18g |
| Cholesterol | 110mg |
| Sodium | 180mg |
| Carbohydrates | 39g |
| Sugar | 24g |
| Protein | 6g |
Approximate values based on standard USDA data.
Conclusion
Mastering the art of a perfect Coconut Cream Pie allows you to bring a timeless bakery-quality dessert into your own home kitchen. This recipe focuses on the foundational techniques of custard making, ensuring that every slice delivers a balance of silky sweetness and tropical texture. By utilizing real coconut milk and a patient tempering process, you avoid the chemical aftertaste associated with store-bought mixes. The contrast between the crisp, buttery crust and the mountain of light whipped cream creates a satisfying experience for the palate. Remember that the secret to success lies in the chilling time, so plan ahead to allow the filling to reach its optimal density. Your guests will appreciate the effort required to make a fresh filling from scratch rather than using pre-packaged alternatives. This pie is a celebration of simple ingredients transformed through heat and precision into something truly remarkable. Whether you are a novice baker or a seasoned pro, the results of this Coconut Cream Pie will surely impress with its deep, authentic signature coconut flavor.
Frequently Asked Questions
Can I use coconut milk from a carton instead of a can?
You should avoid using refrigerated carton coconut milk because it has a high water content and lacks the necessary fat for a thick custard. Canned coconut milk provides the essential fats that contribute to both the flavor profile and the structural integrity of the pie. Using the thinner alternative will result in a runny filling that does not set properly.
How do I know when the coconut custard is done cooking?
The custard is finished when it reaches a consistency similar to heavy pudding and large bubbles begin to pop on the surface. You should see the whisk leave clear trails in the mixture as you stir it across the bottom of the pan. If the mixture is still liquid or runny, it requires more time on the heat to activate the cornstarch.
What should I do if my custard has lumps?
You can fix a lumpy custard by immediately straining it through a fine-mesh sieve into a clean bowl while it is still hot. This process removes any curdled egg bits or dry starch clumps that formed during the heating phase. Stirring vigorously with a whisk during the cooking process is the best way to prevent this issue from occurring initially.
Can I make this coconut pie a day in advance?
Making this pie 24 hours in advance is actually recommended as it allows the custard layers to fully stabilize and the coconut flavor to deepen. Store the pie in the refrigerator and wait to add the whipped cream topping until about an hour before you plan to serve it. This prevents the cream from weeping or losing its volume while sitting in the fridge.
Why is my pie crust soggy after adding the filling?
A soggy crust usually occurs if the shell was under-baked or if the pie was not chilled quickly enough after assembly. Ensure you blind-bake your crust until it is fully golden brown and crisp before adding the moist coconut custard. Cooling the crust completely before adding the filling also creates a temperature barrier that helps maintain the pastry’s texture.
Print
Coconut Cream Pie: The Ultimate Creamy Homemade Recipe
- Total Time: 275
- Yield: 8 slices
- Diet: Vegetarian
Description
A rich American custard pie made with a flaky crust, tropical coconut filling, and whipped cream topping. Infused with natural coconut oil and sweetened with real sugar for a balanced, chewy texture.
Ingredients
9-inch pre-baked pie crust
2 cups whole milk
1 cup full-fat coconut milk
3 large egg yolks
2/3 cup granulated sugar
2 tablespoons cornstarch
1/2 cup shredded coconut
1/4 teaspoon salt
1/2 cup heavy cream
2 tablespoons powdered sugar (optional, for whipped cream)
Instructions
Preheat oven to 350°F (180°C). Bake pie crust as needed for pre-baking.
Whisk egg yolks, cornstarch, sugar, and salt in a large bowl until smooth.
In a saucepan, combine whole milk and coconut milk; heat over medium until warm (160°F).
Temper egg mixture by whisking in 1/2 cup of the warm milk mixture until fully incorporated.
Pour tempered mixture back into saucepan with remaining milk; add shredded coconut.
Cook over medium heat, stirring constantly, until the custard thickens (about 5 minutes).
Pour filling into prepared crust and chill for 4 hours before serving.
Notes
Toasted coconut on top enhances texture
Cornstarch is critical for stable, silky filling
Chill thoroughly to ensure sliceable texture
- Prep Time: 20
- Cook Time: 15
- Category: Easy Romantic Sweet Treats
- Method: Baking
- Cuisine: American