
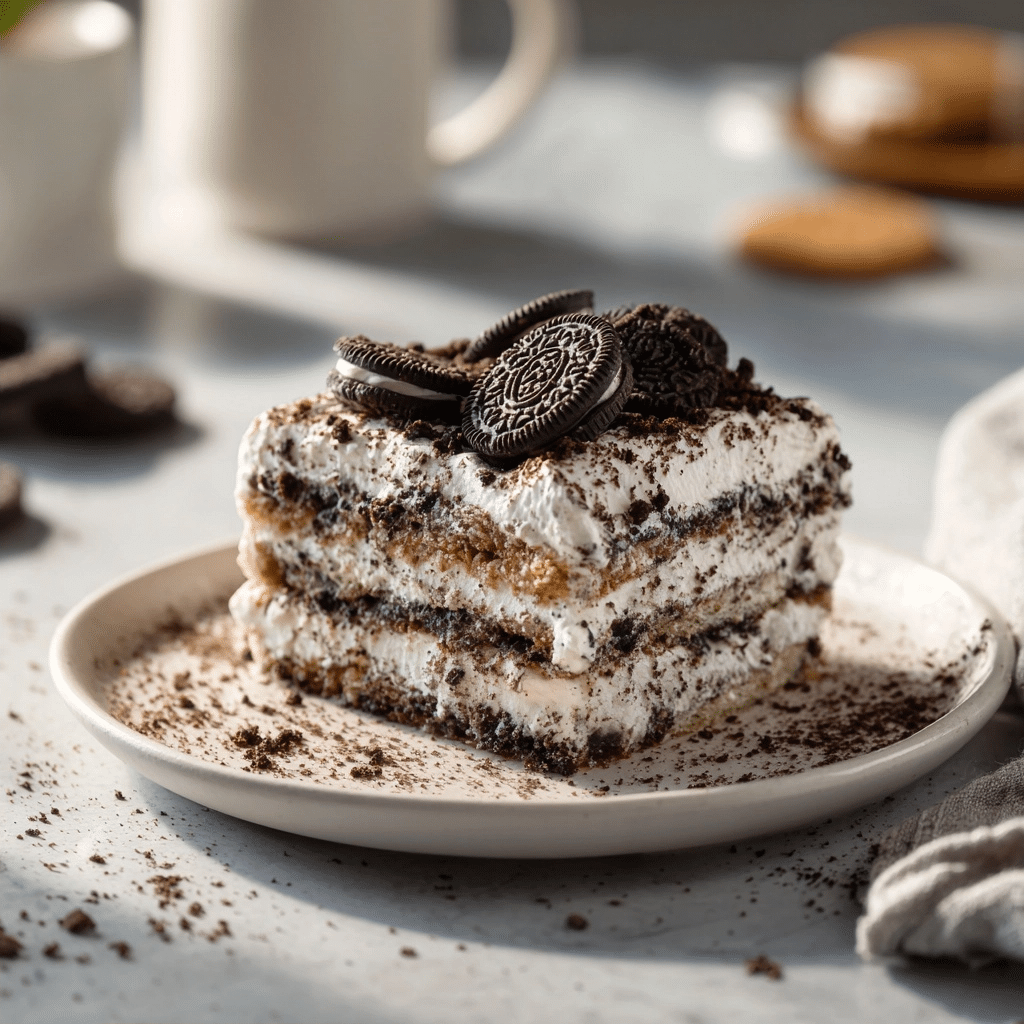
Oreo Icebox Cake is a decadent no-bake dessert featuring layers of chocolate sandwich cookies and light, sweetened whipped cream that soften into a cake-like consistency. This classic Oreo Icebox Cake relies on a simple chemical reaction where the moisture from the heavy cream permeates the cocoa-rich wafers over several hours. You will find that this dessert eliminates the need for an oven, making it an ideal choice for high-temperature summer months or busy holiday schedules. The combination of bittersweet chocolate biscuits and airy vanilla cream creates a balanced profile that appeals to both children and adults. Preparing this dish requires minimal equipment, primarily a stand mixer or hand-held beaters, and a standard rectangular baking dish for assembly. By allowing the components to rest together, you transform brittle pantry staples into a sophisticated, sliceable masterpiece that mimics the texture of a traditional baked sponge cake.
The success of the Oreo Icebox Cake depends entirely on the chilling duration, which ensures the cookies reach the perfect level of softness without becoming soggy. This specific method uses high-fat heavy cream to maintain structural integrity when sliced, providing a clean presentation that looks beautiful on any dessert table. Because the recipe uses only five core ingredients, the quality of your vanilla extract and the freshness of your cream significantly influence the final flavor. Many home bakers prefer this method over traditional baking because it is foolproof and allows for early preparation. Transitioning from cold cream to a stabilized whipped topping is the most critical technical step in the entire process. Once assembled, the cake benefits from a final garnish of chocolate syrup to add a professional finish and a boost of cocoa intensity.
Recipe Overview
| Prep Time | Cook Time | Total Time | Servings | Difficulty | Cuisine |
|---|---|---|---|---|---|
| 20 Minutes | 0 Minutes | 12 Hours (Chill Time) | 12 Servings | Easy | American |
Why This Recipe Works
The Oreo Icebox Cake works exceptionally well because the cookies act as structural sponges that absorb the water content from the whipped cream. I have found that using heavy whipping cream with at least 36% fat content creates a stable matrix that does not weep or deflate during the long refrigeration period. In my professional experience, adding the powdered sugar toward the end of the whipping process ensures a silky texture while providing just enough sweetness to complement the dark chocolate wafers. The overnight rest is the secret variable that converts a crunchy biscuit into a soft, cake-like layer that yields easily to a dessert fork.
This dessert is a favorite in my kitchen because it eliminates the risk of over-baking or sinking centers common in traditional cakes. I appreciate how the vanilla extract rounds out the dairy notes, preventing the whipped cream from tasting overly flat or bland. When I serve this to guests, they are often surprised that such a complex-looking cross-section comes from a simple assembly of store-bought cookies. It provides a reliable, consistent result every time, making it a stress-free option for large gatherings or family celebrations. The dark cocoa of the Oreo provides a sharp visual contrast against the white cream, making every slice look professionally crafted.
Ingredients
| Ingredient | Quantity | Notes and Alternatives |
|---|---|---|
| Oreo Cookies | 2 packages (approx. 30 oz) | Standard size; do not use Double Stuf as they may be too sweet. |
| Heavy Whipping Cream | 2 cups | Must be very cold; use 36% fat content for best stability. |
| Powdered Sugar | 1/4 cup | Also known as confectioners’ sugar; helps stabilize the cream. |
| Vanilla Extract | 1 tsp | Use pure vanilla extract rather than imitation for better flavor. |
| Chocolate Syrup | To taste | Drizzle over the top before serving for extra decoration. |
Step-by-Step Instructions
Phase 1: Preparing the Stabilized Whipped Cream
- Pour the chilled heavy whipping cream into a large, cold mixing bowl to prepare for aeration.
- Beat the cream on medium-high speed until it begins to thicken slightly.
- Add the powdered sugar and vanilla extract gradually while continuing to whisk the mixture.
- Continue beating until stiff peaks form, ensuring you do not over-mix and turn the cream into butter.
Phase 2: Assembling the Layers
- Spread a thin layer of the prepared whipped cream onto the bottom of a 9×13 inch baking dish.
- Layer Oreo cookies evenly over the cream base, fitting them as closely together as possible.
- Add another generous layer of whipped cream over the cookies and smooth it with a spatula.
- Repeat the layering process until you have used all the cookies and cream, finishing with a cream layer.
Phase 3: Setting and Garnishing
- Cover the baking dish tightly with plastic wrap to prevent the absorbsion of refrigerator odors.
- Chill the cake overnight in the refrigerator for at least 12 hours to allow the cookies to soften.
- Drizzle the top with chocolate syrup immediately before serving to maintain a fresh appearance.
- Slice into squares using a sharp knife and serve chilled.
Chef Tips for Perfect Results
- Chill your mixing bowl and whisk attachment in the freezer for 15 minutes before beating the heavy cream to achieve maximum volume.
- Place a few extra crushed Oreos on top of the final cream layer before chilling to add a textural contrast to the soft cake.
- Use a offset spatula when spreading the cream to ensure even thickness across all corners of the pan which prevents uneven sagging.
- Dip the cookies briefly in high-fat milk before layering if you need to serve the cake in 6 hours rather than 12.
- Keep the heavy cream in the back of the refrigerator where it is coldest to ensure the fat globules bond correctly during whipping.
Common Mistakes to Avoid
Using warm heavy cream is the most frequent error as the fat will not emulsify or hold air, resulting in a liquid mess. You must ensure the cream is straight from the refrigerator to achieve the stiff peaks required for structural support. Another mistake is using Double Stuf Oreos which contain too much filling and can make the cake overly greasy and structurally unstable. Stick to regular-sized cookies to maintain the ideal cookie-to-cream ratio. Skipping the overnight chill is a significant mistake because the cookies will remain hard and the cake will shatter when sliced. You must allow at least 12 hours for the moisture transfer to occur perfectly. Finally, avoid using granulated sugar instead of powdered sugar because granulated sugar will not dissolve in cold cream, leaving a gritty texture.
Variations and Substitutions
| Original Ingredient | Substitution | Impact on Flavor |
|---|---|---|
| Oreo Cookies | Golden Oreos | Creates a vanilla-forward, buttery flavor profile. |
| Vanilla Extract | Peppermint Extract | Adds a refreshing minty notes perfect for winter holidays. |
| Chocolate Syrup | Caramel Sauce | Introduces a rich, buttery sweetness that pairs well with cocoa. |
| Heavy Cream | Coconut Cream | Provides a tropical undertone and makes the recipe dairy-free if using vegan cookies. |
Serving Suggestions and Pairings
This Oreo Icebox Cake serves as a magnificent centerpiece for a backyard summer barbecue or a casual family birthday party. You can portion the cake into small, neat squares and serve them on chilled dessert plates to maintain the temperature. For a more formal occasion, consider individual glass parfaits where you layer the components in small jars for a personal touch. Pairing this rich dessert with a cold glass of milk or a strong cup of dark roast coffee balances the sweetness levels beautifully. If you are serving this during the summer, fresh raspberries or strawberries on the side provide a necessary acidic counterpoint to the creamy chocolate. It is also an excellent make-ahead option for potlucks where oven space is limited.
Storage and Reheating
| Method | Duration | Instructions |
|---|---|---|
| Refrigerator | 3-4 Days | Keep tightly covered with plastic wrap or in an airtight container to maintain moisture. |
| Freezer | 2 Weeks | Wrap tightly in foil; thaw in the refrigerator for 4 hours before serving for a semi-frozen texture. |
Nutritional Information
| Nutrient | Amount per Serving |
|---|---|
| Calories | 385 kcal |
| Total Fat | 22g |
| Saturated Fat | 14g |
| Cholesterol | 55mg |
| Carbohydrates | 44g |
| Sugars | 31g |
| Protein | 3g |
Approximate values based on standard commercial ingredients.
Conclusion
Mastering the Oreo Icebox Cake allows you to provide a high-impact dessert with minimal effort and zero baking time. This recipe demonstrates how simple ingredients like heavy cream, powdered sugar, and chocolate cookies can transform into a sophisticated culinary experience through the power of refrigeration. By following the precise steps of whipping the cream to stiff peaks and allowing for an overnight rest, you ensure a texture that is both light and satisfying. The addition of vanilla extract and chocolate syrup provides the depth of flavor needed to elevate this from a simple snack to a celebratory cake. Whether you are preparing this for a large crowd or a small family treat, the consistency of the results makes it a reliable addition to your dessert repertoire. The dark chocolate wafers of the Oreo provide the necessary structural base while the cream softens them into velvet. Remember to keep the cake refrigerated until the very moment of serving to preserve the crispness of the chocolate syrup drizzle and the firmness of the cream. Your guests will appreciate the classic flavors and the nostalgic appeal of this timeless no-bake dish. Every bite delivers a perfect harmony of cocoa intensity and dairy sweetness that defines the signature Oreo flavor profile.
FAQ
Can I substitute whipped topping for the heavy cream?
Yes, you can use stabilized whipped topping if you prefer a sweeter and more firm texture. This substitution will alter the flavor profile significantly as commercial topped products often contain different fats and sweeteners. The cake will hold its shape longer at room temperature when using these alternatives.
How do I know if the cookies are soft enough to serve?
The cookies are ready when a thin knife or toothpick can slide through all layers without meeting any hard resistance. This typically occurs after 12 full hours of refrigeration as the moisture migrates into the biscuit. If the cookies still feel crunchy, return the cake to the refrigerator for an additional four hours.
What should I do if my whipped cream is too runny?
You must continue beating the cream until stiff peaks form to ensure the cake does not collapse under its own weight. If the cream will not thicken, it may be too warm and requires additional chilling in the freezer for ten minutes. Avoid adding more sugar as this will only thin the mixture further without providing structural stability.
Can I make this Oreo Icebox Cake two days in advance?
This dessert is actually better when made 24 to 48 hours in advance of your scheduled event. The extra time allows the flavors to meld and ensures every cookie has reached the optimal cake-like consistency. Ensure the dish is sealed very tightly to prevent the cream from absorbing any refrigerator smells.
What is the best way to slice this cake cleanly?
Use a sharp chef’s knife and wipe the blade clean with a damp cloth between every single cut. This prevents the dark cookie crumbs from smearing into the white cream layers, maintaining the distinct visual stripes. Chilling the cake for at least an hour after decorating with syrup also helps stabilize the top layer for slicing.
Print
Oreo Icebox Cake
- Yield: 12 servings
- Diet: Vegetarian
Description
A no-bake American dessert featuring layers of Oreo cookies and whipped cream, chilled to create a soft, cake-like texture. Light, indulgent, and perfect for summer or holidays.
Ingredients
Two 14-ounce packages Oreo cookies
2 cups heavy whipping cream
1/2 cup powdered sugar
1 teaspoon pure vanilla extract
1/4 cup chocolate syrup (for garnish)
Instructions
Crush 10-12 Oreo cookies into fine crumbs. Reserve 4 cookies whole for the top.
In a chilled bowl, whip heavy cream with vanilla extract and powdered sugar until stiff peaks form.
Press half the Oreo crumbs into the bottom of a 9×5-inch loaf dish.
Add half the whipped cream, then repeat with remaining crumbs and cream.
Smooth layers flat. Chill for at least 8 hours or overnight.
Gently place whole leftover Oreo cookies on top and chill an additional 2 hours.
Drizzle with chocolate syrup before serving.
Notes
Use chilled bowl and whisk for optimal whipped cream.
Use tall-sided dish to prevent overflow during chilling.
Cake can be prepared up to 24 hours ahead.
- Prep Time: 20
- Category: Easy Cake Recipes for Every Occasion
- Method: Chilling
- Cuisine: American